
Preparation is important before installing a floor. We have prepared a flooring installation checklist to guide you on your flooring installation. This flooring installation checklist will help ensure that your newly purchased flooring will be installed safely and correctly. Failing to properly install your flooring can lead to uneven or poorly installed flooring and other flooring issues such as mold or rot. Additionally, proper flooring preparation and installation can help to extend the life of the flooring by preventing issues such as cracking or warping. It also helps keep the cost low as it prevents redoing the process. Here's a checklist you can follow before, during, and after flooring installation.
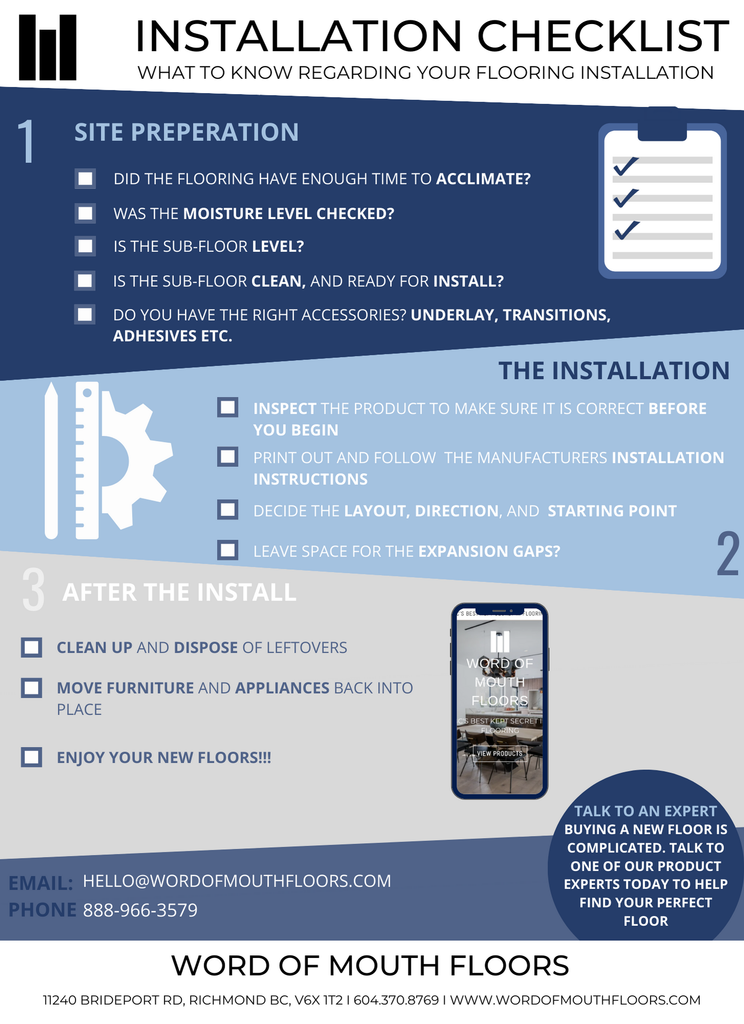
Flooring Installation Checklist: Site Preparation
The following are things you need to do to prepare the site/area before the flooring installation:
1. Did the flooring have enough time to acclimate?
Before installing wood floors, it is important that the floor is at a moisture content (MC) level that is in equilibrium with the environment where the floor will be installed. This process is referred to as acclimation. A failure to properly acclimate flooring (especially wood flooring) may result in excessive expansion, shrinkage, distortion of dimensions, or structural damage. Follow manufacture / suppliers recommended time with boxes in the rooms they will be installed in, and with the heat turned on to expected living conditions. 72 hours to 7 days is a common range depending on the floor type. Longer is better. If a flooring box is wrapped in plastic, the product can not acclimate.
2. Was the moisture level checked?
Moisture is bad for wood. Besides damaging hardwood floors, it can also damage subfloors. The right tools can be used to perform a variety of moisture tests. Check your moisture levels with your flooring installer to determine which tests will be most effective.
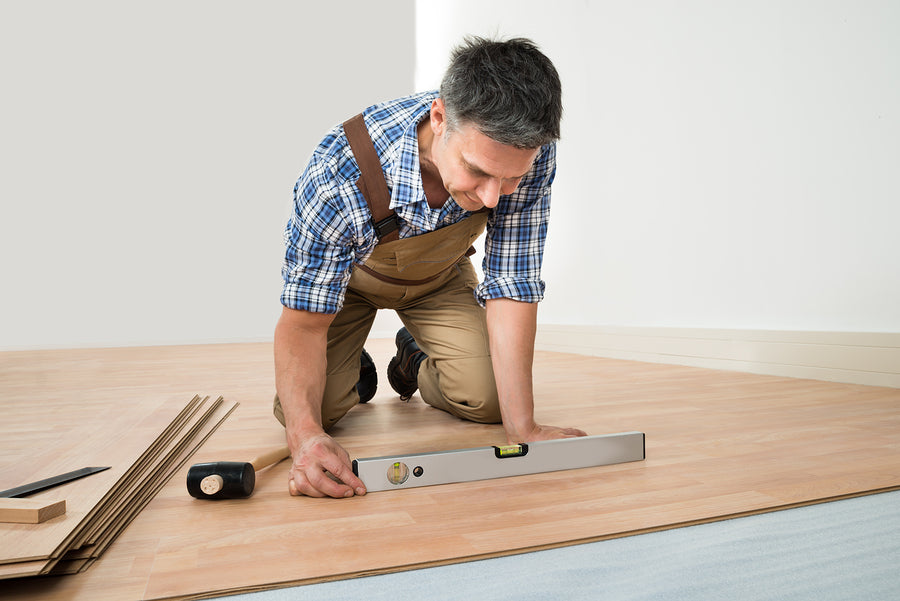
3. Is the subfloor level?
When you have a concrete slab or uneven concrete floor, you may see some high spots that can be ground out by using an angle grinder (concrete grinding tool). You can use a liquid floor leveling product made for concrete floors if your subfloor is made of concrete or your floor has low patches. Same goes for plywood (wood) subfloors. Level sub floors is one of the most important things you need to focus on before an installation is done. Issues with the subfloor is one of the most common problems, and one that DIY customers under estimate the most. Take subfloors very seriously, and consider involving a professional.
4. Is the subfloor clean, and ready for installation?
A subfloor is usually made from plywood, oriented strand board, or concrete. Subfloors must be cleaned and clear of any debris before any type of flooring is installed. You may run into serious problems later on if you don't clean and dry a subfloor before laying down new material.
5. Do you have the right accessories? Underlay, Transitions, Adhesive, etc.
The right flooring accessories are essential for making any wooden floor look flawless and finished. Your investment in high-quality flooring materials will always be worth it, regardless of how expensive the floor is. Additionally, flooring accessories can cover and camouflage structural details such as expansion gaps, pipes, etc., in the floor. It is also important to consider that flooring accessories contribute to your floor's comfort, functionality, and even safety. The use of flooring accessories helps ensure that hardwood floors are durable, hard-wearing, and have long-lasting power.
Flooring Installation Checklist: The Installation
Below is the list you need to follow during the flooring installation:
1. Inspect the product to make sure it is correct before you begin
It is important to check the flooring after delivery to ensure that it is in good condition and that there are no damages or defects. This can include checking for scratches, dents, or other types of physical damage, as well as making sure that the flooring is the correct color and style as what was ordered. Additionally, checking the flooring during delivery allows you to ensure that the correct quantity was received and that there are no missing pieces. If any issues are found, it is important to address them with the delivery service and the seller at the time of delivery.
Before you begin installing, and after tyhr flooring has acclimatized you can consider doing a dry run. It can be helpful to plan the layout in advance. Long boards in highly visible areas (if the product is random lengths) means your premium lengths will look best in highly visible locations. Short prices used at the end of runs or in corners and closets. Does your product have variation? If yes, spread the visual look out as desired. Even for laminate or vinyl floors this is helpful. Many laminate or vinyl products repeat every 6 planks or so... so avoid two planks that look exactly the same being placed side by side.
2. Print out and follow the manufacturer’s installation instruction
Following the flooring installation instructions will ensure your floors are secure and will last for a long time. NWFA is a national association that almost all wood flooring suppliers follow, so if in doubt and you can not find install instructions from your supplier, then consider consulting NWFA guidelines for wood floor installation.
3. Decide the layout, direction, and starting point.
You should consider more than just your personal taste when choosing the direction in which your wood flooring will run. It is also subject to several principles of design. Wood flooring planks should be laid out so that they lead to the focal point or center of the room. Is there a fireplace in your home that you would like to highlight? Is there a particular architectural detail in your living room that you find particularly beautiful? This should be the direction in which the wood flooring boards are placed. What is the way light falls in your home? A room may appear longer or shorter depending on how light falls on the flooring.
4. Leave the space for the expansion gap.
It is essential to provide expansion gaps when installing floors, especially floating floors. There will be changes in the temperature and humidity in all rooms. Because of this, floating floors will expand and contract as the temperature and humidity change. Thus, leaving expansion gaps will solve this issue. Follow installation guidelines.
Flooring Installation Checklist: After The Installation

Do the following after the flooring installation:
1. Clean up and dispose of leftovers
There will likely be leftover installation materials and parts after an installation. You can dispose of them in your regular household waste collection. The remaining boxes / planks from your installation should be saved in case any planks need replacement due to water damage or scratches. A couple of boxes in storage is always a good idea. Flooring is a fashion industry, so if you do not keep any, and the product is discontinued (which they all will be eventually) you may regret it.
2. Move furniture and appliances back into place
After the flooring installation is complete, couches, tables, and cabinetry can be be put back in place.
3. Enjoy your new floors!
Installing new flooring can be a big project, but the end result is often worth the effort. Following this flooring installation checklist will help you achieve the best installation for your flooring. Whether you choose hardwood, vinyl, laminate, tile, or carpet, the new flooring should add a fresh look to your home and make it feel more comfortable and inviting. Enjoy your new floors!
Other flooring blog articles you may want to read:
EVERYTHING YOU NEED TO KNOW BEFORE INSTALLING NEW FLOOR
FACTORS TO CONSIDER BEFORE INSTALLING VINYL FLOOR
VINYL FLOORING INSTALLATION TECHNIQUES
LAMINATE, VINYL, AND ENGINEERED HARDWOOD FLOORING OPTIONS: WHAT MAKES THEM DIFFERENT?